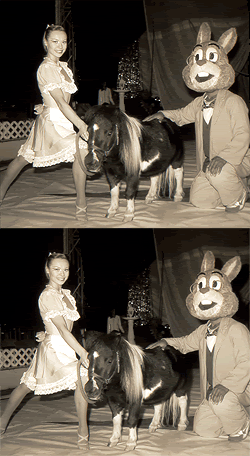
Step 1: Turn one of the cameras upside down to get the two lenses as close together as possible (lenses aren't usually located in the center of the camera). Line the cameras up so the lenses are on the same level.
Step 2: Tape the cameras together with duct tape. Don't cover up the shutter buttons or winding mechanisms.
Step 3: Go out and shoot! To take a picture, press both shutter buttons at the same time.
Step 4: Just have fun and accept that this method won't give you pro results.
Since the lenses are about 4 inches apart and human eyes are usually 2.5 to 3 inches apart, the 3D effect won't be perfect. And besides, it's a disposable camera, so treat it as a toy and just have a good time.
Tips:
Having subjects in the foreground and the background will show more of the 3D effect. Just like any good 3D horror movie, the best shots show something coming out of the picture at you.
Remember that the cameras won't focus closer than about three feet.
If you need to use flash, turn on the flashes for both cameras and expect things to come out a little weird.

How To View
Method 1
The simplest way to see the stereo effect is to view the two images side-by-side. Cross your eyes until the two images become three images. Focus on the image in the center and you’ll be able to see the 3D effect. It’s tricky to get the hang of, and feels extremely weird, but it does work.
Method 2
Here’s how to do it in Photoshop:
Step 1: Scan your stereo images.
Step 2: Select the first image, copy and paste it into a new file. Select the 2nd image, copy and paste it into the same file. You’ll now have two layers on top of each other.
Step 3: Open the animation window (Window -> Animation). There will be one frame by default. Make a second frame by clicking on the little “page” icon at the bottom of the animation toolbar.
Step 4: Click on the second frame.
Turn off the top layer by clicking on the “eye” icon. Now the frames should show one image in the first frame and the other image in the second frame.
Step 5: Set the interval by clicking on the frame where it says “0 sec.” Change the delay interval to 0.1 seconds. Do this for both frames. Click the “play” icon to see how your animation looks. If it’s “wiggling” too fast, change to interval to 0.2 or 0.3.
Step 6: When you like what you see, save for web (File -> Save For Web) as a GIF file. Ta-dah! All done.

Via: Photojojo

I'm trying this! Gracias.
ReplyDelete